My daughter asked me to teach her to quilt.
I was making half square
triangles for another quilt, so I gave her some to "play with", to
let her discover how many different blocks you can make with half square
triangles.
Then I taught her how to use the sewing machine to sew a 1/4" seam,
and another quilter was born!
We used the tube method for making the HSTs, so she got plenty of practice
sewing the 1/4" seam while making the tubes. After completing the blocks, she sewed background fabric around each block. This makes the joining sashing blend into the front of the quilt.
This is her first quilt, made on a standard sewing machine with a small harp. She cut and sewed all the blocks, cut the backing and the batting, made the sandwiches, and pounced the quilt patterns. I then quilted most of the blocks one at a time.
I tried a new method of joining that worked very well, so I thought I'd share it. It may sound a bit strange at first, but the results speak for themselves.
This is the method I used to join the blocks:
1) Quilt all the blocks and trim to the same size.
2) Butt 2 blocks together. Make sure the quilt design is right side up. (Ask me how I know, lol).
Using a wide and long zig zag
stitch, zig zag the 2 blocks together.
3) Make yards of sashing strip, ironed with both edges to the middle, like
binding, but flat. The sashing only needs to be wide enough to cover the zig zag with 1/4" on either side, to firmly secure the blocks together.
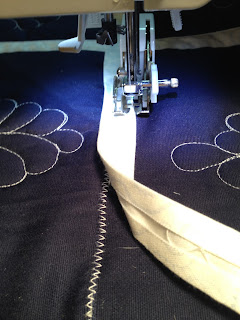
4) Sew a strip of the sashing FLAT over the zig zag, sewing both edges to
the blocks.
Then repeat on the other side. You will see the stitching lines from the first side of
the quilt to guide you in placement of the reverse side. The photos show the first sashing sewn, and how both look when done.
Zig zag, and then immediately sew on the sashing. This way there is only one
block to the inside of the needle.
It makes for very easy sewing, and a remarkably flat and cozy quilt.
5) Join the first 2 rows together with zig zag.
Make sure the sashing strip is long
enough for the entire row. I used a few drops of Elmer's glue on these long
strips.
Everything is really flat, so it is easy to straight stitch the sashing
over the join.
Then repeat on the other side.
Join the rest of the rows just as the first one, until the entire quilt is together. Then bind it, and it's done! See how nice and flat the blocks lay, even without pressing?
The end result is a lovely reversible quilt.
This is the easiest method I have ever used for joining a sashed quilt.
What a great beginner quilt, right? She even free motion quilted 2 of the
blocks herself. Her first quilt, and already free motion quilting.
The signature is something that makes it special, and I could never have
done it if not on an individually quilted block.
The quilt tester approves.
If anyone else has come up with another trick for joining, please share!
Thanks for visiting my blog.
Happy quilting!


Way to go young lady. You did a fantastic job. As a new quilter myself at the age of 76 I am proud of you. Keep up the great work.
ReplyDeleteMarilyn from Ontario, Canada
What does the back of the quilt look like after doing it this way
ReplyDeleteThe navy blue side is the back. The cove strip is first applied on the back. Then matching cover strips are put on the front, using the stitching lines from the back as a guide. It's very flat and sturdy. Sorry to take so to reply.
DeleteThe dark blue side with the white sashing is the back of the quilt. The quilt designs really show up on the back. This makes the quilt reversible if you like.
ReplyDeleteSimply 👌 AWESOME !! I can't wait to try this !! And keep going, I've been quilter 30 years and I'm truly IMPRESSED !! THANX A MILLION FOR SUCH A GREAT IDEA !!
ReplyDeleteThat is so wonderful. And a first quilt, amazing. I would think your method of putting it together would prevent stretching of the seams and get a much better match of the blocks.
ReplyDelete