Wednesday, April 27, 2016

USE THE EASY ANGLE RULER TO MAKE DOUBLE STAR BLOCKS AND SASHING

Do you love the look of sashing stars? The Easy Angle ruler can really simplify making any type of star point, and save you having to trim up, too.  If you aren't familiar with how to use this ruler, go to Youtube.com and watch the videos first.

                   Just look at how perfect these points are without any trimming.

Step 1- cut the rectangle or sashing strip to size


Step 2- if the pattern calls for cutting a   2-1/2"block and sewing on the diagonal-

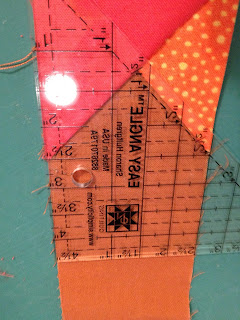
INSTEAD--- use the EAR to measure what the block would cover.
This strip is 2-1/2 " wide, and the ruler is on the 2-1/2" mark.
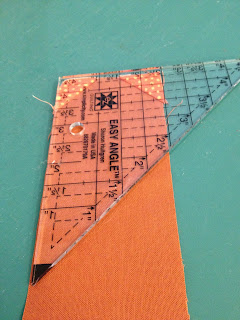
Cut off the piece. (see next photo)


Step 3---   cut the corner piece from the next color 2-1/2" strip.


See how perfectly the pieces line up?
Sew with 1/4" seam, and finger press open.


Look how even it is- no trimming needed. That saves so much time, and frankly, trimming isn't my favorite part of quilting anyway.

For the next star point, cut another 2-1/2" corner piece from the next color 2-1/2" strip.


The dog ear will overhang. I like to cut it off before I sew.


Sew with 1/4" seam, check for accuracy, then trim underneath. (Save the trimmed piece for another project)


Here are your perfect double star points, no trimming, ready to go in your quilt.

Friday, April 8, 2016

Use the Companion Angle ruler to make flying geese from a charm square

(This post is part of a series on ways to use easy angle and companion angle rulers in stitch and flip blocks-)

Why would you want to make flying geese from charm squares? 

If you want a bunch of scrappy flying geese, raid your 5 inch square stash, and get 4 goose "bodies"  from one charm square.


1) Fold the charm square in half. 2 1/4" (1-3/4" finished) is the largest set possible from a 5" square.

 2) Cut out the first 2 triangles.

 3) Open the leftover side pieces, and trim to make 2 more triangles.
 4) Now you have 4 goose bodies ready for the side triangles.
 4) Now use the Easy Angle ruler to cut the companion pieces from your background fabric. If you've never made geese with the Easy Angle and Companion Angle rulers before, watch the videos on YouTube. Perfect, accurate flying geese, no waste, no trimming.

Tuesday, April 5, 2016

Stitch and Flip with EASY ANGLE AND COMPANION ANGLE RULERS

It's not just for HSTs anymore!

Do you love little corner triangles, but not the corner square marking and clipping?
With the EASY ANGLE ruler, you can get almost twice as many corners from a strip of material.
No marking. No trimming. No little leftover triangles.

Step one- cut piece to put the corners on.

Step 2- determine the size of the square the pattern calls for-
the picture shows a 1 inch "square"


Step 3-measure a 1 inch "square", and cut off the small triangle;

 The corner triangle cut off- this is the only waste.


 Step 4 - Cut a strip from your yardage the same width as the corner triangle needed.           (I needed a 1 inch strip)
        - cut length for however many triangles you need.
             (I only needed 2 for this demo).


Step 5 -    
 Cut the size triangle you need; you can cut multiple corners at once. (Handy for making snowballs)

 I used the ruler to cut off the other dog ears, for exact piecing.


Step 6 -           Match the pieces like so. Sew a 1/4" seam. There are wonderful videos on YouTube for this ruler. You really should watch one, it helps!


Step 7-       Check that the corners are still square (or rectangle).

If you still want HSTs for the border, use the ruler. It works great with no trimming needed.

Thanks!