Monday, December 30, 2019

EASY PEASY HALF SQUARE TRIANGLES-MY FAVORITE WAYS

I love making quilt blocks and borders with HSTs, but I hate trimming them to size.
A few years ago I discovered Shortcut Sheets (no affiliation) for making lots (70) of HSTs at a time, already trimmed and ironed flat, with the dog ears removed.

https://www.youtube.com/watch?v=A91W0tUTFyg

Here are some of the things I've made this way-


 I usually use my ruler to check on whether the HSTs are exact.

 It takes a bit more time, but since the units are already pressed and trimmed, it's worth it. You don't need to make them all the same. By using different fabric in every other strip, you can get a scrappy look.


Tuesday, November 26, 2019

JOINING QUILT AS YOU GO BLOCKS INTO ROWS

HAPPY THANKSGIVING 2019!
Yikes, it's been forever since my last post.

This is the quilt I made for my friend Gerry. I didn't want to break up the log cabin pattern with sashing, so I invented my own method to make it easy to sew on my home sewing machine.
 Here in the back of the quilt. I used my walking foot to stitch in the ditch. I just kept turning the blocks. I used a printed copy of clip art leaves and stitched them with free motion quilting.

 Putting the rows together. Double check that you have them in the right order. Fold back the back and batting, so you are only sewing on the blocks of the quilt top.       Then turn the quilt over, and join as in the first tutorial. You can join the rows using either hand stitching, or use a thread in the bobbin that really blends with the top.

    After I sewed all the blocks together, I trimmed the quilt square.

I wanted to add a half square triangle border. To add a quilt as you go (individually quilted border), You will quilt only the top and batting with the quilting pattern. You can mark it, or do it free motion; either way it's easy. Be sure to leave at least 1/2" unquilted on both edges, for joining.

 Trim the sides of the batting 1/4".


Now, cut a strip of backing 1" wider than the border piece, and sew it to the OUTSIDE EDGE of the border.  No binding! I have another quilt I'm making this way, and I'll take more pictures. This blog is really for me to remember and perfect how to do it. 

Tuesday, July 31, 2018

A DIFFERENT WAY TO JOIN QUILT AS YOU GO (INDIVIDUALLY QUILTED QUILT BLOCKS)


My daughter asked me to teach her to quilt. 
I was making half square triangles for another quilt, so I gave her some to "play with", to let her discover how many different blocks you can make with half square triangles.
Then I taught her how to use the sewing machine to sew a 1/4" seam, and another quilter was born!
We used the tube method for making the HSTs, so she got plenty of practice sewing the 1/4" seam while making the tubes. After completing the blocks, she sewed background fabric around each block. This makes the joining sashing blend into the front of the quilt.


This is her first quilt, made on a standard sewing machine with a small  harp. She cut and sewed all the blocks, cut the backing and the batting, made the sandwiches, and pounced the quilt patterns. I then quilted most of the blocks one at a time.

 I tried a new method of joining that worked very well, so I thought I'd share it. It may sound a bit strange at first, but the results speak for themselves. 


This is the method I used to join the blocks:

1) Quilt all the blocks and trim to the same size.

2) Butt 2 blocks together. Make sure the quilt design is right side up. (Ask me how I know, lol).
 Using a wide and long zig zag stitch, zig zag the 2 blocks together.
 

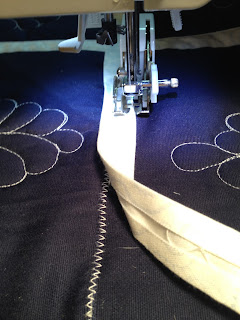
3) Make yards of  sashing strip, ironed with both edges to the middle, like binding, but flat. The sashing  only needs to be wide enough to cover the zig zag with 1/4" on either side, to firmly secure the blocks together.


4) Sew a strip of the sashing FLAT over the zig zag, sewing both edges to the blocks.

Then repeat on the other side. You will see the stitching lines from the first side of the quilt to guide you in placement of the reverse side. The photos show the first sashing sewn, and how both look when done.


 Zig zag, and then immediately sew on the sashing. This way there is only one block to the inside of the needle.Join all the blocks in one row this way.
It makes for very easy sewing, and a remarkably flat and cozy quilt.

5) Join the first 2 rows together with zig zag. 


Make sure the sashing strip is long enough for the entire row. I used a few drops of Elmer's glue on these long strips. 
Everything is really flat, so it is easy to straight stitch the sashing over the join.

 Then repeat on the other side.
Join the rest of the rows just as the first one, until the entire quilt is together. Then bind it, and it's done! See how nice and flat the blocks lay, even without pressing?


The end result is a lovely reversible quilt.


This is the easiest method I have ever used for joining a sashed quilt.
What a great beginner quilt, right? She even free motion quilted 2 of the blocks herself. Her first quilt, and already free motion quilting.
The signature is something that makes it special, and I could never have done it if not on an individually quilted block.
The quilt tester approves.


If anyone else has come up with another trick for joining, please share!
Thanks for visiting my blog.
Happy quilting!

Tuesday, August 29, 2017

HOW TO SEW A CONTOURED CLOTH DIAPER FROM FABRIC

I am having a grandson! Another reason to sew!

I cloth diapered my daughter over 30 years ago, and it was really easy with no leaks. Diapers came in packs of 12 from Walmart, and between my baby shower and what I bought, I had over 100 diapers. I used them for burp cloths, loveys, anything and everything. The only waterproof covers were plastic pull up pants which are still made. They used to come in prints and colors, and I especially loved the ruffled rumba pants for under little dresses.
At that time, 10 packs of prefold diapers cost less than $75, and I was all set until she was potty trained.

The diapers came out of the dryer as soft as cotton and as white as snow. I did use bleach and an extra rinse cycle.
I used diaper pins as a closure, but I would have probably have used a Snappi if I knew about them. But the pins are so easy to use.
Who doesn't know how to use a safety pin?

When I looked online at all the new kinds of diapers, and the prices? Yikes!
All the snaps and microfiber versus fleece, organic unbleached, all in one.....
Did I mention the prices?
My head was spinning. Cloth diapers are supposed to save you money, right?

Here in my easy version of a contoured diaper for a newborn. It still needs pins or a Snappi, and a waterproof cover, but is goes on easily with no folding needed.


I had 2 yards of this cotton fabric in my stash, perfect for a boy's diaper.For the inserts, I used cotton towels, cut 4 1/2 inches wide by 2 inches short of the height of the diaper.
The toweling should not be in the top or bottom seams.
Prewash the fabric so your diaper won't shrink after you make it.

1)   Decide how big you want the diaper to be- (I suggest reading a lot of the "How to" diaper tutorials on Pinterest before you start).

2) Cut a length of fabric 2" more than the diapers final desired top to bottom measurement.  I got 2 diapers from the width of the fabric. If you don't have continuous yardage, you may use 2 rectangles of different fabrics.
   Trace on the back side (wrong side) of the fabric.
Use a purple disappearing pen or a pencil to trace a diaper you have (or a disposable) for a pattern-
Traced pattern


3) Important!

Open the folded fabric so the traced pattern is only one thickness!

Sorry it's so faint, but the pattern is trace on the lower half of the fabric

4)  Lay the towel/ cotton insert in between the legs of the diaper, midway between top and bottom.


This is on only one thickness of material, on the WRONG side of the fabric.
The diaper will be turned inside out after being sewn, which makes it softer and stronger.

5) Using a longer stitch length, sew the insert to the fabric.


Insert sewn in 
The insert sewn to one side of the fabric

Right side of fabric after insert is sewn on

6)  Fold the fabric in half, right sides together, so that the traced pattern covers both.

Fabric doubled ready to sew
 
7) Leave a 5" opening in the seam at the top for turning right side out later on.


8) Starting at the mark after the insert, sew a 1/2" seam to the inside of the pattern marking line. Use a very small stitch length.

Start at the purple mark indicating the END of the opening

Opening left for turning


9)  Leaving 1/2 " seam allowance, trim the leg seams.


10)  Turn inside out. It's easier if you start turning the bottom tabs first.

Pushing in the bottom corners before pulling the insert through


The opening will turn in naturally. Be sure to catch the edges in you topstitching.


11)  Now start sewing with a usual stitch length, right before the opening you left for turning. Stitch about 3/8" from the edge, to keep the edge softer.


Start topstitching before the opening to sew it closed.
Stitch over the end of where your stitching began to secure.


All done!


Thanks and Happy Diapering!